Custom Blocks Part 1: Creating Custom Blocks
Custom blocks are an advanced and useful feature of the Colorado.gov website platform that allows you to display the same content within multiple pages and regions of the site (as opposed to editing a single piece of content that would have to be copied and pasted to other regions).
Custom blocks allow to also add extra functionality to areas of your site like the jumbotron and footer. Follow the instructions below to create a new custom block.
Note: This is only part one of a two part series of instructions. Once the block is created, it still needs to be displayed through a piece of content to be publicly visible. You can follow instructions for adding custom blocks to various content here.
Step 1: Navigate to Add a Custom Block
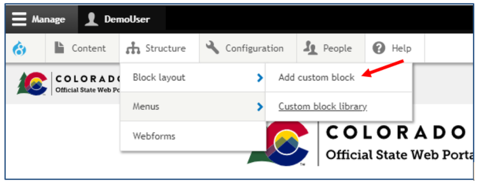
Go to Manage > Structure > Block Layout > Add Custom Block.
Step 2: Choose a Block Type
Select the type of block you want to make: Row, Basic, Simple Maps, Video Jumbotron, or Views Reference Block
- Basic Block
- A block that only provides a body field for editing with the WYSIWYG (similar to a page).
- Row Block
- A block that utilizes rows and cards.
- Simple Maps Block
- A block that displays a location on an embedded Google Map.
- Video Jumbotron block
- A Jumbotron block that allows the display of an uploaded video file as the background.
- Views Reference Block
- A block that displays various views (such as recent article feeds, calendars, etc.).
Step 3: Add a Block Label
Add a label in the Block description box. This does not display for end users. It is used for recognizing the block in the Custom Block Library.
Step 4: Add Content
Add content to the block.
Step 5: Save the Block
Click Save.
Other Resources
Check out some of these other resources that may help.
Are you an EPM?
Entity Project Managers can open help tickets with our Service Desk.
