Uploading Images to the Media Library
Before an image can be displayed on your website, it must be uploaded to your Media Library. Once the image is added to the Media Library, it can be displayed on pages, in Media cards, the jumbotron on the homepage, and anywhere else where images can be shown.
Follow the instructions below to upload your images to the Media Library.
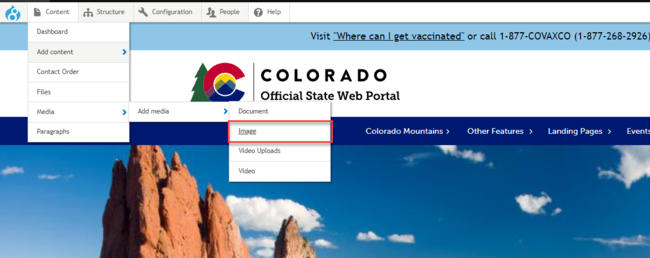
Step 1: Choose to Add New Media
Go to Content > Media > Add Media > Image.
Note: Images can also be uploaded on the fly while editing page. Watch a video tutorial on that here.
Step 2: Add the Image Name
Add a name for the image. This does not display for end users. This is only for sorting purposes when the image gets added to the Media Library.
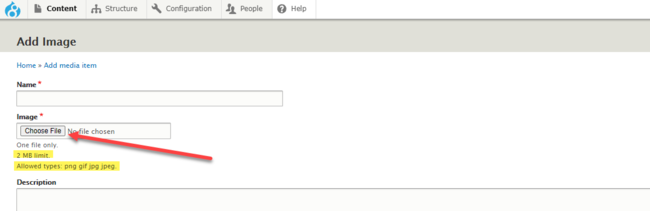
Step 3: Upload the Image File
In the Image field, click the Choose File button. Locate the document that is on your computer and select to upload it.
Note that the image must be less than 2mb. This ensures quicker page load times as large image files take longer to load, especially when internet connection speeds are low. The file types that are accepted are:
- .png
- .gif
- .jpg
- .jpeg
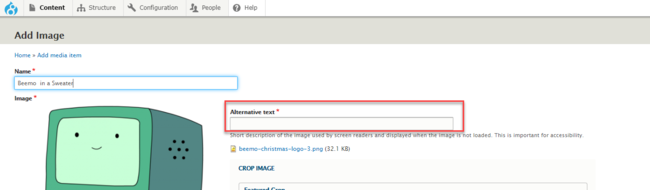
Step 4: Add Alternative Text
Add a short description of the contents of the image in the "Alternative Text" field. This is extremely important to ensure the image on your website is compliant with current online accessibility standards.
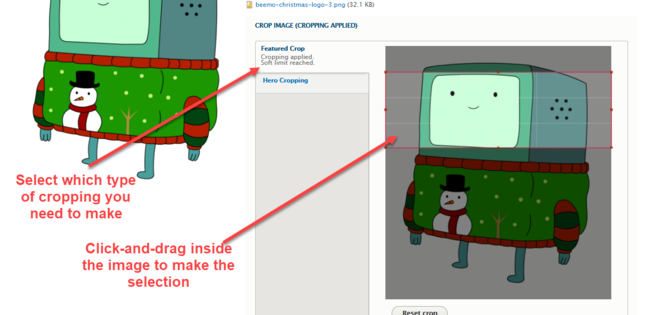
Step 5: Make a Cropping Selection
Next, if necessary, make the cropping selection for your image. This is not necessary if the image is displaying on a page through a Media Card, Image Card, or embedded as a Thumbnail in the body field of a page. This is only necessary if you are placing the image in one of the following areas:
- Featured Crop:
- Featured Images
- Hero Crop:
- Jumbo Slides (for the jumbotron)
- Any Hero Row (as a background image for a row)
To make the cropping selection, simply click the tab for the type of cropping you need (Featured Crop or Hero Crop), place your cursor over the image, and click-and-drag the cropping window over the image to make the selection. If you need to reset the crop and try again, click the Reset Crop button.
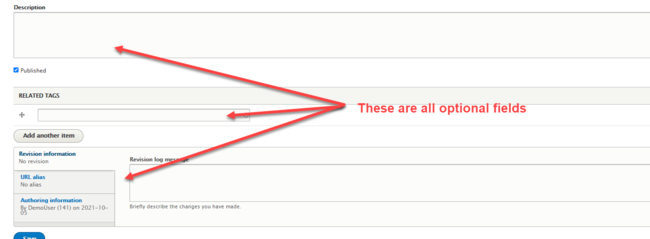
Step 6: (Optional) Provide Additional Details for the Image Media Item
The rest of the fields on this page are optional. You may choose to skip the rest of these fields if you wish. Adding information in any of the following fields will do the following:
- Description: This adds a short description for logged in users viewing the image in the Media Library.
- Related Tags: Custom tags can be created to related files in the Media Library to one another. Multiple tags can be added. This is especially useful if you have a lot of files in your Media Library. Learn more about how tags and relationships work in our Creating Relationships Using Tags tutorial.
- Revision Information: This adds a log revision message to help track changes made to a Media item.
- URL Alias: Customizes the URL path for the image's media item that gets created once the image is uploaded to the media library. End users do not interact with this. It's recommended to leave this field empty.
- Authoring Information: Manually changes the general information about the media item.
Step 7: Save the Image to the Media Library
Once all the required fields have been completed, click Save.
Once saved, a new media item will be created for the image, which will be added to your site's Media Library. Once you have add the image to your Media Library, you can display it on any region of your site where images can be displayed.
Other Resources
Check out some of these other resources that may help.
Are you an EPM?
Entity Project Managers can open help tickets with our Service Desk.